Bootstrap Checkbox Design
Introduction
In some cases the simplest aspects might actually become very critical-- especially in case you get to need them. As an example just how do your site visitors connect with the web pages you set up stating a basic Boolean action-- simply yes or no referring to some of the questions you want to ask, how they do consent to the conditions and terms or maybe line up a handful of the achievable options they might have. We typically get past this with no paying very much of an interest to the feature liable for these kinds of activities but the Bootstrap Checkbox Label is really a pretty significant feature-- one our forms can't actually do without.
Located in current fourth version of the Bootstrap system we are presented with the
.form-check.form-check-label<div>.form-check.form-check-label<label><input>.form-check-inputSteps to utilize the Bootstrap checkbox:
The checked state for these buttons is only updated via click event on the button.

<div class="btn-group" data-toggle="buttons">
  <label class="btn btn-primary active">
    <input type="checkbox" checked autocomplete="off"> Checkbox 1 (pre-checked)
  </label>
  <label class="btn btn-primary">
    <input type="checkbox" autocomplete="off"> Checkbox 2
  </label>
  <label class="btn btn-primary">
    <input type="checkbox" autocomplete="off"> Checkbox 3
  </label>
</div>
Once in a while we really need the checkboxes to take place inside our forms without the user really having the ability to bring any kind of action clicking on them-- that is simply where the disabled option arrives in.
Just to disable effectively a checkbox in Bootstrap 4 employing the typical HTML attribute
disabledIn the case that you appreciate the concept and actually want to work on this you have to appoint the
.disabled.form-checkOne more representation
When working with checkboxes, wrap them in a
<label>.custom-control.custom-checkboxOperate
.custom-control-input<input>As well utilize two
<span>.custom-control-indicator.custom-control-description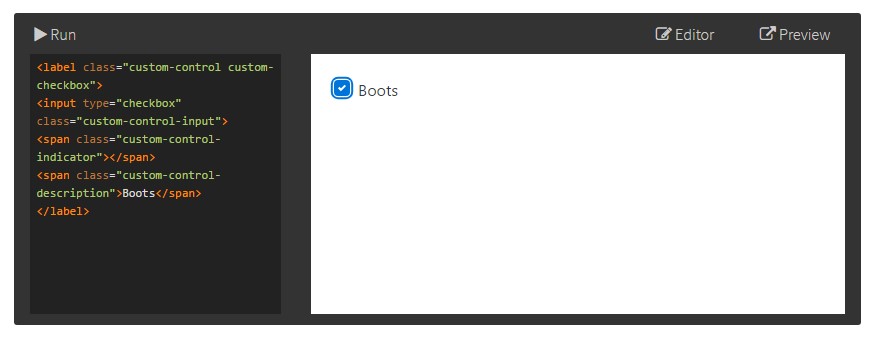
<label class="custom-control custom-checkbox">
<input type="checkbox" class="custom-control-input">
<span class="custom-control-indicator"></span>
<span class="custom-control-description">Boots</span>
</label>
Bootstrap Checkbox Position forms
Default radios and checkboxes are greatly enhanced upon with the support of
.form-checkThe disabled class will at the same time light up the text color to help identify the input's state.
A brand new component for the Bootstrap edition 4 system is the release of the so called customized form elements. These are the identical features we are familiar with inside usefulness however styled even more desirable and with the Bootstrap manner. Having them you can surely bring in some taste as well as charm to your material via just assigning a handful of special classes to the commands you include in your forms.
To utilize custom checkboxes wrap them inside a
<label>.custom-control.custom-checkbox<input>.custom-control-input<span>.custom-control-indicator.custom-control-descriptionFinal thoughts
That's essentially all that you have to complete in order to include a checkbox component inside of your Bootstrap 4 powered site and add in a number of customized flavor to it adding in it a fantastic looks. Now all you require to do is repeat the exercise till you have actually examined all the checkboxes required are actually on the web page.
Review a number of video clip guide regarding Bootstrap checkbox
Related topics:
Bootstrap checkbox approved documentation

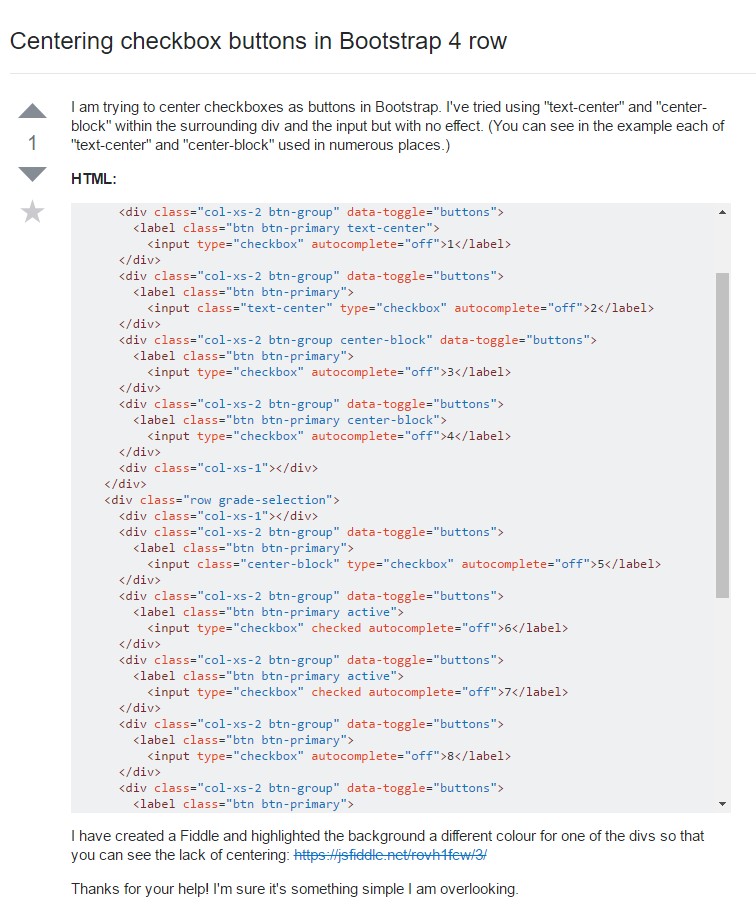
Centering checkbox buttons in Bootstrap 4 row
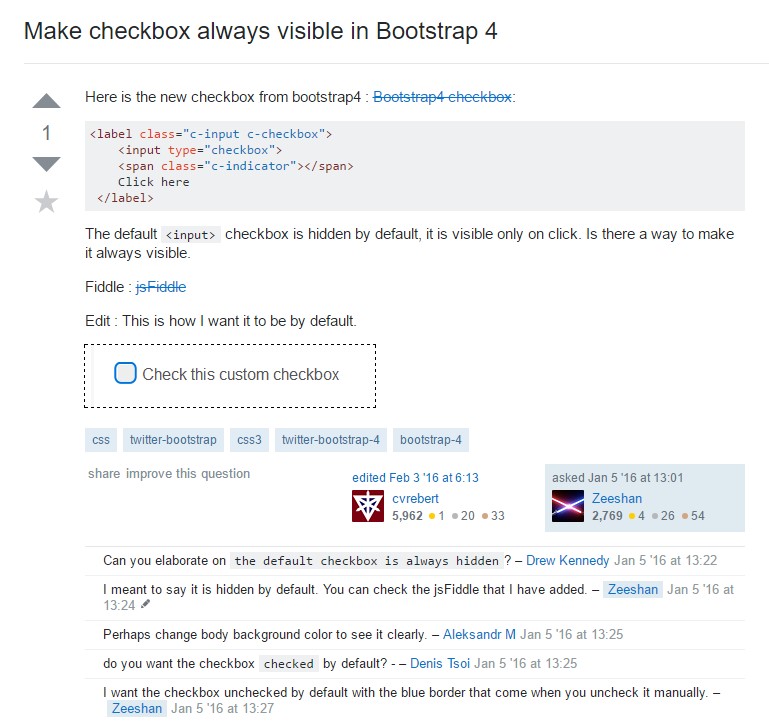
Make checkbox always visible in Bootstrap 4